My other sites |
New Summer Look :)
 |
GUI applications are event driven systems All the GUI components can generate events or respond to events - A button will generate an ActionEvent - A mouse will generate a MouseEvent - A menu will generate an ActionEvent - A frame will generate a WindowEvent |
| ActionEvent : A component-defined action occurred ComponentEvent : A component moved, changed size, or changed visibility ContainerEvent : A container's contents changed because a component was added/removed FocusEvent : A component has gained or lost the keyboard focus ItemEvent : An item was selected or deselected KeyEvent : A keystroke occurred in a Component MouseEvent : A mouse action occurred in a Component TextEvent : An object's text changed WindowEvent : A window has changed its status |
|
| Events contain informative fields Examples: - ActionEvents carry a String to identify the component generating the action - KeyEvents carry the code of the key pressed - MouseEvents carry the current position of the mouse |
 |
Events are directed to special objects called Listeners
which then respond to the event. Each listener reacts to a particular type of event The Listener Interface specifies the name of one or more methods which will be executed when the event occurs Any component class may be extended to implement one or more Listener Interfaces To add Listeners to components you use a add<xxx>Listener method |
| 1. Find the Listeners that your class accepts.
Look at the interface specification for addXXXListener 2. Find the methods of the XXXListener and create a class - implementing the XXXListener - giving implementation for all the XXXListener methods - instantiate it and use addXXXListener to register it 3. When implementing the XXXListener's methods you might need to know the interface of the XXXEvent. It's usual to use getSource() and cast to an appropriate Component to retrieve the information you need |
| Interfaces when implemented need an implementation
for all their methods Adapter classes save programmer's time by providing an empty implementation of listener's methods To use an Adapter you need to subclass it and override only the methods which you wish to use You can define an Adapter class : - as an inner class (and use component's fields using this) - as an external class (and need a reference) |
public class MyMouseAdapter extends MouseAdapter{

	public void mouseEntered(MouseEvent e) {
		back = this.getBackground();
		this.setBackground(Color.blue);
		repaint();
	}

	public void mouseExited(MouseEvent e) {
		this.setBackground(back);
		repaint();
	}
}
|
|
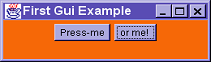
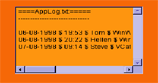
Basic "push to activate" GUI component |
import java.awt.*;
import java.awt.event.*;
public class ButtonTest extends Frame implements ActionListener{
private Button b1, b2;
ButtonTest(String s) {
super(s);
setLayout(new FlowLayout());
myWindowListener mwl = new myWindowListener();
addWindowListener(mwl);
b1 = new Button("Press-me");
b2 = new Button("or me! ");
b1.addActionListener(this);
b2.addActionListener(this);
add(b1);
add(b2);
pack();
}
public static void main(String[] args) {
ButtonTest buttontest = new ButtonTest("BExample");
buttontest.setVisible(true);
}
// Old event Model
/* public boolean handleEvent(Event e) {
if (e.id == Event.WINDOW_DESTROY) {
dispose();
System.exit(0);
return true;
}
return super.handleEvent(e);
} */
public void actionPerformed(ActionEvent ae) {
System.out.println("Button Press received");
System.out.println("Button's action command is:" +
|
 |
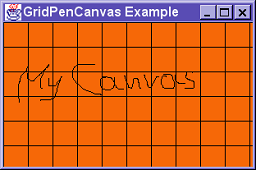
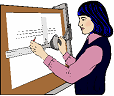
Blank 0x0 Space Can be used to : - draw - write text - handle keyboard and mouse events accepts: - KeyListener -> KeyEvent - MouseMotionListener -> MouseEvent - MouseListener |
 |
|
import java.awt.*; import java.awt.event.*; public class GridPenCanvas extends Canvas |
|
 |
Horizontal menu only Added to a Frame : Frame f = new Frame("testMenuBar"); Menubar mb = new MenuBar(); f.setMenuBar(mb); No event handling |
|
|
A pull-down type of menu Can be added to either a MenuBar or a Menu : MenuBar mb = new MenuBar(); Menu m1 = new Menu("File"); Menu m2 = new menu("Help"); mb.add(m1); mb.add(m2); f.setMenuBar(mb) ; Event handling not needed |
|
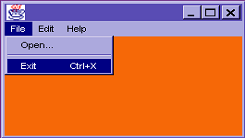
The final leaf nodes: |
import java.awt.*;
import java.awt.event.*;
public class MenuExample extends Frame implements ActionListener{
public static void main(String[] args) {
MenuExample myFrame = new MenuExample();
myFrame.setSize(400,400);
MenuBar myMenuBar = new MenuBar();
myFrame.setMenuBar(myMenuBar);
Menu myFileMenu = new Menu("File");
Menu myEditMenu = new Menu("Edit");
Menu myHelpMenu = new Menu("Help");
myMenuBar.add(myFileMenu);
myMenuBar.add(myEditMenu);
myMenuBar.add(myHelpMenu);
MenuItem myFileOpenMenuItem = new MenuItem("Open...");
MenuItem myFileExitMenuItem = new MenuItem(
|
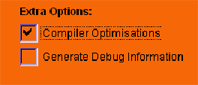 |
A Simple ON/OFF device with a label. Construction : Checkbox one = new Checkbox("One", true); one.addItemListener(theItemListener); add.(one); Event Handling - theItemListener -> itemStateChange(ItemEvent ie) - ie.getStateChange() -> ItemEvent.SELECTED |
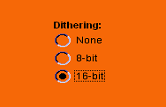 |
Group of Checkboxes - Radio Button CheckboxGroup need to pass to Checkbox's constructor CheckboxGroup cbg = new CheckBoxGroup() ; Checkbox one = new Checkbox("One",cbg,false) ; ….. one.addItemlistener(theItemListener) ; ….. add (one) ; |
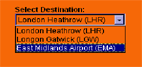 |
A simple "select one from this list" type
of input : Choice ch = new Choice(); ch.addItem("Red"); ch.addItem("Blue"); ch.addItem("Green"); ch.addItemlistener(theItemListener); add(ch); Event Handling same as in Checkbox |
 |
A single line text : TextField tf=new TextField("textField",40); tf.addActionListener(theActionListener); add(tf); Event Handling : - theActionListener -> actionPerformed() - theTextListener - > textValueChanged(TextEvent) Can be set to read-only : - setEditable(boolean) |
 |
- Line - column text area - Displays Scrollbars TextArea ta = new TextArea("Hi there!",10,40); ta.addTextListener(theTextListener); add(ta); Event handling : - theTextListener ->textValueChanged(TextEvent) Can be set to read-only : - setEditable(boolean) |
 |
Several textual options viewed all together: List l = new List(3, true) l.addItem("Red"); l.addItem("Blue"); l.addItem("Green"); l.addItemListener(theItemListener); add(l); Event handling : same as choice. |
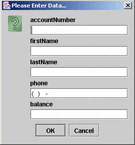 |
Similar to Frame - modal / non modal: Dialog d = new Dialog(f, "Dialog", false); d.add("Center", new Label("Hi there")); d.pack(); -to hide: setVisible(false) -to close: add a Window Listener-> windowClosing() |
|
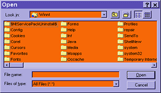
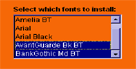
Allows file browsing and single selection : |
 |
- A layout manager does the placing of components in
a container - It is used instead of placing components on pixel coordinates because: 1. The font sizes may differ 2. The screen size may differ 3. The user or the system may resize the window. |
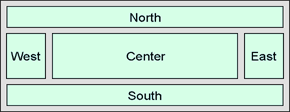 |
- Default layout in top-level containers - The Center component gets all the space that is left after the other components were placed |
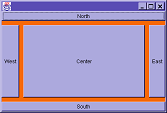 |
import java.awt.*;

public class TestBorderLayout extends Frame {

 public static String[] borders =
   {"North", "East", "South", "West", "Center"};

  public static void main(String[] args) {
    TestBorderLayout tbl = new TestBorderLayout();
    tbl.setSize(400,270);
    tbl.setLayout(new BorderLayout(10,10));
    for(int i=0; i<5; i++)
      tbl.add(new Button(borders[i]), borders[i]);
      tbl.show();
    }
}
|
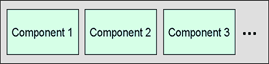 |
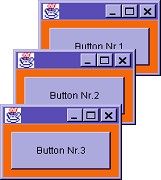
- Default layout in non top-level containers - No need specify the number of added components - Each new component is added to the right of the last one |
 |
import java.awt.*;
public class TestFlowLayout extends Frame {

   public static void main(String[] args) {
     TestFlowLayout tfl = new TestFlowLayout();
     tfl.setSize(400,270);
     tfl.setLayout(new FlowLayout(FlowLayout.LEFT, 10, 10));
     String spaces = ""; // to make every button bigger than its predecessor
     for(int i=1; i<=9; i++) {
 	tfl.add(new Button("Button Nr." + i + spaces));
        spaces = spaces + " ";
     }
     tfl.show();
   }
}
|
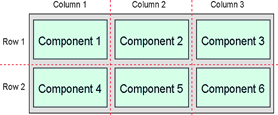 |
- The number of rows and columns has to be specified
at creation - Each cell has the same size, that of the largest component - Components are added left-to-right, top-to-bottom |
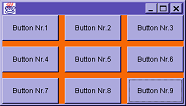 |
import java.awt.*;

public class TestGridLayout extends Frame {

 public static void main(String[] args) {
  TestGridLayout tgl = new TestGridLayout();
  tgl.setSize(400,270);
  tgl.setLayout(new GridLayout(0, 3, 10, 10));

  for(int i=1; i<=9; i++) {
     tgl.add(new Button("Button Nr." + i));
  }
  tgl.show();
 }
}
|
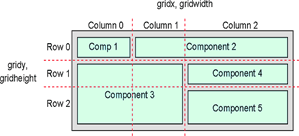 |
- Like GridBagLayout but with cells of
different sizes - Each component's layout is decided by a GridBagConstraints object |
 |
|
|
|
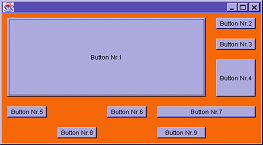
import java.awt.*;

public class TestGridBagLayout extends Frame {

   public static void main(String[] args) {

      TestGridBagLayout tgbl = new TestGridBagLayout();
      tgbl.setSize(500,300);
      tgbl.setLayout(new GridBagLayout());

      // constraints specified here
      GridBagConstraints c = new GridBagConstraints();
      c.fill = GridBagConstraints.BOTH;
      c.insets = new Insets(10,10,10,10);

      // now create the buttons
      c.gridx = 0; c.gridy = 0; c.gridwidth = 4; c.gridheight = 4;
      c.weightx = 1.0; c.weighty = 1.0;
      tgbl.add(new Button("Button Nr.1"), c);
      c.gridx = 4; c.gridy = 0; c.gridwidth = 1; c.gridheight = 1;
      c.weightx = 0.0; c.weighty = 0.0;
      tgbl.add(new Button("Button Nr.2"), c);
      c.gridx = 4; c.gridy = 1; c.gridwidth = 1; c.gridheight = 1;
      tgbl.add(new Button("Button Nr.3"), c);
      c.gridx = 4; c.gridy = 2; c.gridwidth = 1; c.gridheight = 2;
      tgbl.add(new Button("Button Nr.4"), c);
      c.gridx = 0; c.gridy = 4; c.gridwidth = 1; c.gridheight = 1;
      tgbl.add(new Button("Button Nr.5"), c);
      c.gridx = 2; c.gridy = 4; c.gridwidth = 1; c.gridheight = 1;
      tgbl.add(new Button("Button Nr.6"), c);
      c.gridx = 3; c.gridy = 4; c.gridwidth = 2; c.gridheight = 1;
      tgbl.add(new Button("Button Nr.7"), c);
      c.gridx = 1; c.gridy = 5; c.gridwidth = 1; c.gridheight = 1;
      tgbl.add(new Button("Button Nr.8"), c);
      c.gridx = 3; c.gridy = 5; c.gridwidth = 1; c.gridheight = 1;
      tgbl.add(new Button("Button Nr.9"), c);
      tgbl.show();
   }
}
|
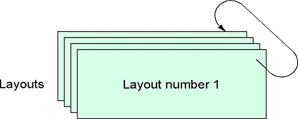 |
- Different from the other layout managers - Have several 'cards' (components) to chose from - Only one card is shown at the time |
 |
import java.awt.*;
import java.awt.event.*;

public class TestCardLayout extends Frame {

  public static void main(String[] args) {
     final TestCardLayout tcl = new TestCardLayout();
     tcl.setSize(100,100);
    final CardLayout cardLayout = new CardLayout(10,10);
     tcl.setLayout(cardLayout);
     for(int i=1; i<=9; i++) {
         Button b = new Button("Button Nr." + i);
      	 ActionListener listener = new ActionListener( {
      	   public void actionPerformed(ActionEvent e) {
      	     cardLayout.next(tcl);
             }
           };
         b.addActionListener(listener);
         tcl.add("Button Nr." + i, b);
     } // end for
     tcl.show();
  }
}
|
 |
1. In which cases you do need to subclass an awt component? Can you think of other possible gui widgets not implemented on awt? Which primitives would you use to implement them? 2. What would had happened if the Layout policy was not an external object from the container object? What does a Layout policy encapsulate? 3. How is it possible for the Swing components to change
the look and feel at runtime? Why is this not possible with awt
components? |
 |
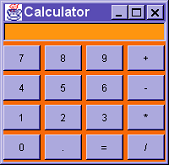
1. Based on the Canvas and Menu Examples, write an application that combines both. Then, add a “clear” MenuItem in the File Menu, that clears the canvas area. Also, add a new Menu for selecting the colour of the pen while drawing. Finally, give the user the option of turning the canvas grid on and off. If you like, you can also add a menu that lets the user change the grid spacing 2. Create the GUI for the Calculator application, shown below. Use container and component Classes like Frame, Panel, Button and TextField. Use layout managers to make the calculator appear to the screen as shown
3. Using the GUI that you created in the previous
exercise, complete the Calculator application. Write event code
that will connect the calculator’s user interface to the appropriate
event handlers for the various calculator’s functions. Then,
write methods that will implement these functions (that is, write
the code that will add, subtract, multiply and divide numbers that
are displayed in the TextField). You may also enhance this application
by adding functions like “M+”, “MR” and “MC”,
as these can be found on standard calculators |